Thursday, December 31, 2015

Simple Scones

SCONES
Just the word brings back the great memories we made in England.
My best friend sent me 3 (three!) bottles of clotted cream. We found a taste for it when we went to England a couple of years ago.
So, of course, I had to make these Simple Scones sprinkled with lemon sugar.
It was a pleasure to make these. I felt like a real baker!


There wasn't a whole lot to these, and I didn't even have to break out the rolling pin. After mixing everything together, the recipe gave the option, after separating it into two pieces, of rolling out the dough or patting it into 6"-inch circles. Patting was no muss, no fuss.
When I sent my friend pictures, she asked for the recipe and immediately made them.

Here are the photos she texed me:
She had a lemon, so she was able to use real lemon zest in the sugar. I didn't have one nor did I have lemon juice, so I used lemon extract.
She also added cranberries and served them with a local jam.

Exchanging photos and throwing around ideas to change them up really brightened my day. I just wish we could have done it in person over cups of hot tea.

You're Never Prepared


This was taken in 2001. I’m with two of the most important mentors of my life, my sister Martha and my mother-in-law Joyce (and I’m holding Thistle). As of this morning, I’m the only one in this photograph still living.

My mother-in-law, my friend, passed away in the middle of the night after a long struggle with pain. She was a Lymphoma survivor which never reoccurred but left her broken, and she battled other things that were thrown at her during her 82 years on this earth with all that she had in her. She taught me a lot about life and I will always miss her. Please keep our family, especially her husband of 61 years and my husband, in your prayers.

Tuesday, December 29, 2015

Making 'Tater Pancakes

This is what I do with my
leftover mashed potatoes.

I found a fun app in my phone that turned my little video into this. It's a little clumbsy, but it's fun! And these potato pancakes are so yummy and easy, you don't even have to use real potatoes from scratch. I use instant potatoes and you wouldn't even know it.


Stir an egg into your bowl of cold potatoes. Season your flour with lemon pepper (or whatever you like). Take a heaping spoon full (a little smaller than the size of the palm of your hand), drop it into the flour, then pick up the ball of potato by scooping your hands under the flour so it won't stick to your hands. Turn it over into the flour to coat the rest. I form the patty by kind of tossing it back and forth from one hand to the other. You can feel the potato flatten with every toss. If it doesn't, just pat it with your hand.

I actually fill the entire pan, cooking about a dozen at a time.

Fry the potato patties in about a half-inch to an inch or so of hot Canola oil (or whatever you prefer). I like to add a splash of Sesame Oil for extra flavor. Let them brown, then turn and let the other side brown. I found the safest way to flip them over is to use a spatula in my right hand and a big spoon in the left. I use the back of the spoon to steady the potatoes as I turn them over.


It only takes a few minutes on each side. Be sure to place them on a plate with several paper towels to help soak up the grease. Salt and pepper to taste.


This is one of my family's favorites.


And now I want some more.


Saturday, December 26, 2015

My Art In The Wild


A friend posted a photo of her nativity scene on Facebook. It touched my heart to see that she placed the silver and gold embossed star I made for one of our ornament exchanges right at the top of the creche.

Thursday, December 24, 2015

Superdeduper Easy Paper Bag Wreath

Have you ever seen a craft and made it as soon as you could get to your craft stuff? I did!


I saw a brief video on Facebook (I can't share the link because all it does is bring you to your sign-in page) on how to make a wreath using paper bags. They used plain white bags with no folds at the bottom. I was curious if you could make one out of regular lunch bags, so I searched and found another video on YouTube by Secret Soto showing just that. I couldn't wait to make one. I went to the pantry knowing we had several packs of printed paper bags in several colors from the Dollar Store, so I chose the red ones. 


The crafter in the YouTube video put glitter along the edges of her bags, but I couldn't wait, so I used a silver Sharpie pen. The glitter is much more awesome, but this isn't bad looking for a first try.

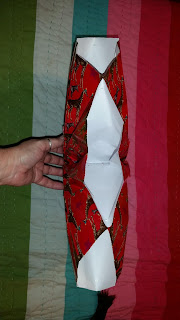
Below is what the bags looked like after gluing them all together. When I stretched it open, I felt the glue (a super strong glue stick) wasn't strong enough to adhere to the glossy paper, so I ended up stapling it to reinforce it.

I found a rosette I had made a long time ago in my craft stash and put it smack dab in the middle. I love the design the folds of the bags make at the center.

Below is a photo of my wreath with a 12" ruler to show you how humongous it is.

And this is what it looks like from the side. I'm not sure how long it would stay puffy if you were to hang it on your door, but I would imagine you could stuff it with tissue paper to assure that it remains full. And I realized the next day I forgot a step, cutting the ends to make it look more like a snowflake rather than one giant rosette. That's okay, I still like it.


You really must try this. It's one of the easiest crafts I've ever done.

Monday, December 21, 2015

We'll Have A Blue Christmas Without You


Our first blue flocked tree! Dawn has always wanted one, and, I must say, it's a lovely little thing. The ugly green wreath below was something I made in the late 1970s-early '80s. My husband's aunt taught me to crochet over a ring of plastic cut from a six pack of coke. I'm embarrassed to say that I made a bunch and tried selling them at a bazaar she sold her stuff at. I think I sold one. So guess what everyone got for Christmas that year?


Merry Christmas!

Sunday, December 20, 2015

Mailable Ornaments

I accidently took this awesomely cool picture above of the paper ornaments I'm about to show you. I'd like to print it out and do some mixed media with it!


At the last minute (of course), and after I had already sealed up a few envelopes (of course!), I decided I wanted to include paper ornaments with our Christmas cards, mainly to my on-line peeps. I did this last year and it was very well received. I thought I'd have them done in a matter of a few hours, but it turned out to be a much bigger project than I anticipated. Aren't they all?


I used the two Spellbinders dies above with a variety of patterned paper, some with a metallic finish, others with a shiny embossed surface and a few, just plain. I liked digging out paper I haven't seen in awhile and actually using it.

The main thing I learned from this is never pile die-cuts like this. This should have been a no-brainer. It took me forever to untangle the dern things. Not only did the swirly ends get tangled up together like a linking puzzle, the fine silver embroidery thread made one big crazy web!


The back of the ornaments
The ornaments were quite easy to make, but they were quite fussy because of the tiny pieces that had to be removed. I cut two "snowflakes," one large (about the size of my hand) one small, and then glued them back to back. I wasn't going to put anything on the back, but I decided at least a small something would better than nothing. Plus, it gave the thinner card stock a little more strength. And I liked the way the white added to the design on the front.


Wha-la! Thin, mailable paper ornaments. I could have gone all inky and glittery on them, but easy was the goal of this craft, and easy is what I got. 

Saturday, December 19, 2015

Yard Work

Our back yard is huge, and with the California drought it's been nothing but dirt this past year. Well, a little rain has finally come to this dry land (hallelujah!) and suddenly an oasis of almost shin-high weeds appeared! We have an electric lawn mower, and with the grass being so wet, I was afraid I'd get electrocuted trying to cut through the thick, wet grass (I know someone who did). So I did what any sane person would do that didn't want to die before their time, ask the great guy who's been cutting our front yard for the last 17 years or so if he'd be interested in doing it on a regular basis.
We have always taken care of the back (cheaper to do it ourselves), but it kept getting away from us. We can't see it from our house because it's blocked by the garage and little house, so it's easy to put it out of our thoughts. So when the lawn guy was here last week I went out and talked to him, showed him the back yard and he said yes! He'll be doing it every two weeks during the winter. I'm so excited! To know it's in the hands of someone so dependable and conscious of doing a good job (and for a great price), well, it's taken a load off my back. Literally.  

I really wish we could see our back yard from inside our house. It's where the doggers like to hang out and provides us with some pretty beautiful sunsets. But I'm not complaining. I'm just grateful every day we have this place to call our own.


Tuesday, December 15, 2015

Celebrate Your Uniqueness

I recently joined a couple of Julie Nutting paper doll groups because I like this stamp line so much. I enjoy seeing what other people do with them and use those ideas as inspiration to make my own. I jumped right in and volunteered for two swaps, this one, which I'll mail this week, the other, a January swap.

I wanted to make a galaxy-like background for this doll I had in my stash of already made dolls. So I chose my Color Burst concentrated powder to see what they could do.

I spritzed the watercolor paper tag with water then sprinkled on each color. There was a lot of water and color, so I needed to soak some up, but I didn't want to mess with the design. So I took my embosser and hit it with some heat to set the color. It was still pretty wet, so I layed a piece of multi-media paper on top of it and rubbed, which resulted in a pretty cool pattern on both pieces of paper. I'll use the extra piece in another project.

I blended regular watercolors to cover the white spots, and splattered gold, white and black paint. When everything was dry, I edged it with black Staz-On ink and added tiny little dots of sparkly Stickles. 
The circle and swish lines she's standing on were cut with Dawn's new die set, which I absolutely love. I glued them in place with Glossy Accents and inked and glued down the lettering as well. I was going to tie ribbon at the top of the tag, but I decided that I like it without it.
I want to stamp the envelope I'm sending this in, so I'll get that done next and then off she goes! I'll sweat it out until I hear from my swap buddy, but I'm sure she'll like it. Not gonna lie, this is difficult to let go of, but I can't keep them all.

Sunday, December 13, 2015

My Rainbow Scarf

Sneaky photo by Dawn

The other day at Costco, this very friendly lady came up to me and told me how much she liked my scarf. I wonder why?

Every time I wear this crocheted scarf Valerie made me, someone compliments me. Commence bragging rights!


Thursday, December 10, 2015

Doggers


My crafting buddies. I love it when they hang out with me in my craft studio. It was so funny. Monday they were laying in their own beds, and the next time I looked over they had switched places! Such silly goofers.


They both love Dawn's new Christmassy blanket Valerie surprised her with. It's very, very soft.


One ear up!


I asked Molly if she wanted a sweater because she was snuggled up around my pillows in a little ball.


I brought out the heart sweater, held it up and asked her again. She got up and walked over to me, like, yes, mama, put it on me!

Wednesday, December 9, 2015

Beautiful Skies

I couldn't believe it when I looked outside and saw this giant eagle in the sky!


And another night I spotted this beautiful sunset.

And then lovely streaks across the sky. But I almost missed the moon.


I love how Dawn and I race outside with our phones or cameras when we realize we're missing something beautiful.