Thursday, March 3, 2016

Cardboard Butterfly Challenge


Enter Eye Connect Crafts'
March Design Challenge!

My friend Donna Berlanda, who is such an encourager, posted a link to this contest over on the Eye Connect Crafts site as a Facebook comment for my postcard butterflies. The rules are you have to make something out of chipboard or cardboard. I thought, Donna knows me well, it's right up my alley!

I dug into my stash of cardboard and stamped it with the large butterfly with text background that came in Inkadinkado's cling stamp set called Insect Amalgam Cling Set #60-60219 (link at the bottom). As you can see, it's a very good-sized stamp. It's what makes it so fun to color with the Gelatos and other watercolor crayons.
Inkadinkado Insect Amalgam Cling Set #60-60219

After stamping, I painted on a couple of coats of Glue N' Seal by Ranger. This seals the surface and allows the Gelatos to move and blend smoothly. I trimmed away the blank margarine and ended up with a piece approximately 6"x6" inches. I roughed up the edges by running the blade of my scissors across them. It gives them the natural look I like so much.


I cut a larger piece of cardboard and gave it a couple of coats of Glue N' Seal as well. I stamped it with the text part of the butterfly stamp, tricky, but it worked. I took a black Gelato and drew a square where the butterfly would be placed, then blended it out so it gave it depth after the butterfly piece was in place.

I cut a small square of corrugated cardboard and backed the butterfly with it, then attached that to the piece of cardboard with stamped texted. The corrugated piece was added to pop it up some so it would stand out better after framing.


My daughter Valerie gave me a shadow box with a black frame (thank you, Val!) for me to frame everything.

I didn't care for the fuzzy black background of the frame, so I tore it off and sanded the backboard, gave it a coat of white gesso and a couple of coats of parchment-colored acrylic paint.


When everything was dry, I put adhesive and foam squares on the back and adhered it to the frame backboard.

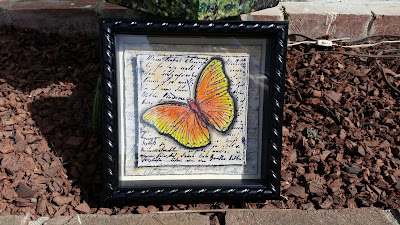
Here's my finished butterfly! I photographed it on my desk and in my back yard in several areas to try and place it in a good light. But what I ended up doing was only confusing myself because I can't decide which one I like best. Ha!


It's difficult to convey the depth of the shadow box.

My father made this pagoda in the 1970s for one of my best friends' parents. (We were in the ceramic business at the time.) After her mother passed away, she gave it to me. I love having it in the yard. And when the tiny light bulb isn't out, it glows a nifty green.


I'm off to enter the contest. Wish me luck!


Disclosure – This post contains affiliate links, which means that at no cost to you, I may make a tiny commission if you decide to make a purchase. The products I link to are those that I believe in, regardless of any commission I may make from them. My goal is to help you easily find the tools, products, or other items that you will need to complete your project.

Tuesday, March 1, 2016

Butterfly In The Sky...

Bet you're singing the Reading Rainbow song, aren't ya?
I have had this stamp for a while now, but I never knew what to do with it. So I took it out and stamped a few images onto mixed media paper and decided Gelatos and other watercolor crayons might be fun to use.
I was right, I absolutely loved making these! I put a coat of Glue N' Seal on them because it allows for blending. Without sealing it, (depending on the paper), they just don't move around well enough to get these results. You can seal your paper with any type of decoupage medium such as Mod Podge or Deco-Page. I prefer a matt finish, but glossy would work just as well.
When they were finished I realized they'd make great postcards, so I backed them with cardstock, drew a line down the middle and did a little stamping.


You can see the mixture of watercolor crayons I used below. I probably have too many.

It's rare I do a craft over and over, unless it's for a specific group project. But I enjoyed making these so much, I'm going to make another set.


Disclosure – This post contains affiliate links, which means that at no cost to you, I may make a tiny commission if you decide to make a purchase. The products I link to are those that I believe in, regardless of any commission I may make from them. My goal is to help you easily find the tools, products, or other items that you will need to complete your project.