Tuesday, October 16, 2012

Elephant-Themed Card Holder

Let me start off by saying, "Arrgggghhh!" Blogger is not cooperating with me today. It wins. If the spacing between paragraphs is off, please pardon Bloggers insistence it be wonky. Ugh.
 
I made this greeting card holder for my daughter Valerie, who loves elephants. She gave me a few sheets of her favorite scrapbook paper from her collection and it worked out fabulously. The background paper is very cool, it simulates elephant hide and feels a bit like leather. I fussy cut the images of the elephants from another sheet and used yet another print on the inside.
The back was done the same way as the front. I was going to fussy-cut the entire elephant, but my daughter told me she really liked it with the background. She has an eye for stuff like that, I like it as well.
The inside print looks like a rock wall and matches the grey color scheme going on. The left side has a corner pocket that can be used for smaller cards that won't fit between the two rings or for letters that accompany the cards my daughters receives. I cut up an envelope and adhered a piece of the printed paper left over from fussy-cutting the elephants on the front.

For the right side I took a library card pouch and attached a square of the elephant hide print card stock and slipped a keepsake tag into it.
See the texture of the this paper? I love it!
 
I'm on the lookout for the perfect beads to slip on the rings.

I'm quite happy with the way this one turned out. It suits what my daughter likes and will be something I hope she can use for years to come.

Photos by dawt on Flickr.

Saturday, October 13, 2012

Today We Celebrate Life!


A year ago today my daughter Valerie donated a kidney to my sister Martha. A few of us our getting together to share a meal and appreciate the love and fierce loyalty we have for one another. The Lord has blessed us beyond measure.

Photo: Martha and 3 of her 4 kidney donors (our sister Mary passed away last year). Martha at the forefront, our brother Burt (the hairy dude), my daughter Valerie and our brother John. Each of Martha’s 4 kidney transplants in her 60-years of life have been considered successful. Contrary to popular belief, transplanted organs can last anywhere from a few months to 20 or 30 years.

Please consider organ donation, the ultimate gift of life.

Thursday, October 4, 2012

Halloween Cards

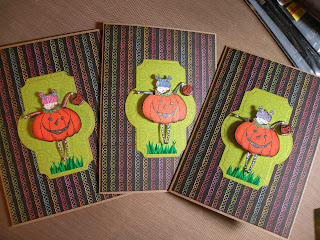
Dawn bought a set of the cutest Halloween stamps I ever did see, and, of course, I had to get my grubby little hands on them first. I love this little witch so much! I used colored pencils and markers to doll them up then fussy-cut them and applied them with pop-dots. I stamped more little pumpkins and used Glossy Accents on them then popped them up as well.

I used both sides of the same paper for the card, added the sparkly candy piece and stamped "Trick or Treat" on it. The tiny spider is a sticker. They were a lot of fun to make.


I was going to make my second batch of Halloween cards like this, but there was more to it than I first thought. Whoever gets this one will be receiving a one-of-a-kind. I made more with this adorable little stamp and will upload images of those later.

I stamped extra pumpkins and applied Glossy Accents, let them dry, cut them out and then popped them up with foam pop-dots along the strip and in her little hand. I stamped again and colored her costume and fussy-cut it so I could pop that up as well. Of course, everything is edged with ink to finish it off.


I love this little girl so much, I gave her tiny red Swarovski crystals in her ponytails. I kept the inside simple by using white ink to stamp a tiny Boo! I can just see her saying that in a squeaky little voice when the doors she knocks on are opened.


I made a few more cards, this time using a die-cut that sort of mimics her little pumpkin self. I stood her in a tuft of grass, which was cut from a strand of stickers I’ve had forever.

I popped up the pumpkins again with pop-dots and added tiny little flower beads to her ponytails.

You can’t really see it in the photos, but the eyes, nose and mouth of the big pumpkin sparkles as does her collar, hair and dots on her tights.

 
Again I made the inside simple only this time I embossed the word Boo! instead of stamping it with wh white ink.

 I love this little girl as well, she's so stinkin' adorable!


I believe I'm done with Halloween cards, but I'm thinking about doing a few for Thanksgiving. Then there's Christmas, and if it takes me as long to do those as it did these, I better get going right now!

Thursday, September 27, 2012

My Most Memorable Halloween:

It was the late 1960s, I was 10 or 11, living at Fort Ord, California (my dad was in the Army), and I wore this as part of my princess Halloween costume. Back in the day you could find cool things like chunky jewels and sweet-16-prom-type dresses at the Salvation Army or Goodwill for only a couple of bucks. My princess dress was poofy, green and covered in the prettiest lace. I wore it two Halloweens in a row because I loved it so much.

My friend Betty and I were at the last few houses, a grouping of 4, all facing one another, walking away from the last door we knocked on when all of a sudden 4 guys came running down the ice plant hill and one of them grabbed my pillow case full of candy. I was trying to hold on to it while one of them was flinging me around in circles, and Betty and I were screaming and crying for help. No one came out of their houses to help.


The bad thing is that they got my candy, bent the heck out of my ring and twisted it tight to my finger. But the good thing is that they didn’t see the filled-to-the-brim UNICEF box I held tight to my chest! A couple of my siblings went back out and trick-or-treated so I would have a little candy cause they were awesome like that, yo.

What’s your most memorable Halloween?

Saturday, September 22, 2012

55 And Still Alive!

September 23rd I will be welcomed into the world of senior citizens. Double nickles. Old pooty.

The photo above is part of a greeting card book I saved when we cleaned out the remnants of my mother’s things. A lot of it was icky from being stored in the garage, so I went through it and tore out the pages on which my mom had written each of our names and years of birth. It was such an awesome thing to come across; I plan to send my brothers’ and sister’s their pages on their birthdays. It’ll be one of those bitter-sweet things, but I’m hoping more of the sweetness will shine through.

Saturday, September 8, 2012

Tangent Memories

While cleaning out some stuff of my mom’s I saved a few old Christmas cards that were sent to her. I thought it would be neat to cut out just the signatures because many are from people are gone now. I sat down and actually followed through with my idea and put them into my Smash Book.

I like how it turned out and that I didn’t have to hang on to the entire card, just part of it, because that would have taken up lots of storage space I don’t have.

Thursday, August 30, 2012

Books, I Made A Couple!


I made these journals for my daughters' birthdays and titled them with their favorite Jane Austen books, Persuasion for Dawn, Pride and Prejudice for Valerie. It was interesting to put these together having never made a book in my life. I learned a lot from the process and would like to take the time to make one that requires the stitching together of pages. We’ll see. I uploaded a ton of photos onto my Flickr that I took while making them if you’re interested. I still can’t believe the top two turned out like I imagined. Rarely does that happen when I’m crafting, it usually just sort of evolves into its own thing.


I used Tim Holtz grunge board for the covers, inked them up and sealed them with a coat of Mod Podge Hard Coat. I purposely swirled the Mod Podge Hard Coat around to give it more texture when it was dry.


I love the feel of that grunge board, it’s like super thick fabric-y feeling card board, it’s so flexible and bendy. It even took the creasing well.


The actual design on the front cover was made by stamping brown card stock then applying several coats of the Mod Podge Hard Coat (the regular is too sticky for my taste). When I was satisfied with the coverage I let it dry then scrunched it up to give it that worn, leather look. When that dried I attached it to the grunge board with some super strong red double sticky tape and gave the entire front another coat of Mod Podge Hard Coat.

The ribbon I used on the inside front and back covers (to cover up the back of the brads and eyelet) was too white, so I aged it with Vintage Photo Distress Ink by Tim Holtz


For the paper I used some packaging filler paper that came with something one of my daughters ordered. There seemed to be a whole ream of the stuff, and I loved how it felt, so I rolled it up thinking it would be neat to use for something vintage-y looking.


The embellishments on either side of the clasps are brads, the base plate is metal and the latch is leather attached with an eyelet on back.


I’m sure I broke all sorts of book-making rules, but I wasn’t going for perfection, I was just hoping to have something extra ordinary to give my girls.