Showing posts with label buttons. Show all posts

Tuesday, June 25, 2013

Cards, Shrinky Dinks and Buttons

A graduation card commissioned by my daughter. This time I went with silver and white just cause I thought it was pretty. Instead of using vellum for the bottle I used white card stock and spritzed it to a shiny silver finish. I still love making those feathers.

I have used this silver printed paper with script on it for quite a few project, it's one of my favorites.
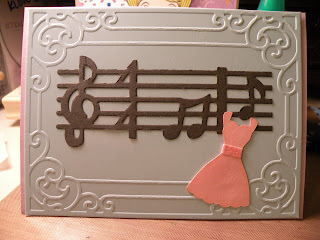
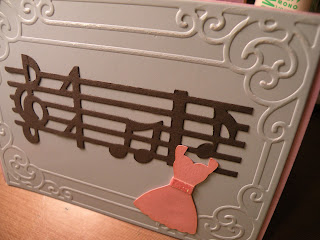
My best friend has played the piano since I've known her. Recently she decided to take piano lessons to sharpen her skills. Every so often she'll send me a video of her latest triumph. Her first one was "Over The Rainbow" and I may have sobbed all the way through it.
I wanted to send her a simple thank you for letting her know how much I appreciate her music. I embossed the packaging of the embossing folder I used here because I liked the pretty blue color. The musical border is from a new die Valerie bought me, I love it! I even spritzed it with some Night Magic (by Avon, it's what I wear), because she likes that sort of thing.
I played around with some shrink art and a darling stamp Dawn surprised me with. I made a Mother's Day card using this stamp for my best friend and I thought it would make a nifty magnet.
I colored it with markers before shrinking and I like how bold the colors are, but the Shrinky Dink itself came out kind of wonky. I should have baked it in the oven instead of using my embossing heat gun. Next time...
 
I'll leave you with some of my buttons.

Friday, May 3, 2013

Giant Buttons? Yes, Please!

I had such fun dressing up these giant wooden buttons I found at Michael's for only 29-cents a piece! After fighting with the equally giant labels on the back of them (it took like half-an-hour to get all the sticky off), I finally managed to create a nice clean surface.

I challenged myself to make each one different, so I had to dig out my thinking cap. The first one was a no-brainer. I used some sparkly candy-print card stock on both sides.
The first thing I did was ink the wood with Adirondack's Watermelon, especially around the edge, so it would match the paper.
The card stock was adhered using Glossy Accents on both the wood and paper for a more secure hold.
I really like how this turned out. I mean, who doesn't like sparkly candy?!
The second one started out with different inks. I just dabbed here and there, then added some Color Shine to it. I thought it would make a nice background for the rhinestones I wanted to cover it with.
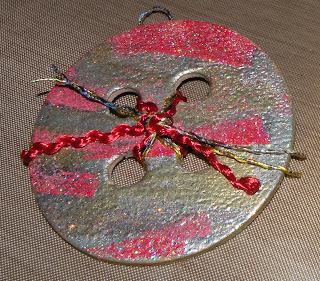
But it was just okay, and I didn't like it, so I decided to go another route. I love working with embossing powders and that's what I used here.The back is black metallic and feels like rubber, it's pretty nifty.
This button is covered in Washi tape and was a lot of fun to do. It was a very simple process and I could probably make dozens more, I liked it so much.
I simply laid the tape down, overlapping just a tad bit. When it was in place I turned it over and trimmed the edges then did the other side, this time in blue. When that was in place I cut out the center circles. I added a hanger to it by placing it on the blue side and putting another piece of tape over it. I gave both sides a couple of coats of Mod Podge Hard Coat and I'm very pleased with the result. You can use regular Mod Podge, but I don't like the tackiness it leaves behind. The hard coat formula is my favorite because it leaves a smooth, non-sticky finish.
 All tied up with a pretty pink bow made of vintage seam binding.
For the last button I used fabric cut from an upholstery book. I laid down a layer of Mod Podge Hard Coat, placed the fabric on top of the wooden button, then covered the fabric in another layer of Mod Podge. I used my embossing gun to help the drying process because I was anxious to finish it. It dried to a nice hard surface, better than I thought possible.
I used my Cropadile to punch the holes and finished enlarging them with my craft knife.
A piece of natural twine was used for the hanger which I tucked behind the fabric on the back. The bow was made using vintage seam binding. I love the feel of this old stuff, so silky, and it makes such pretty bows.
The back bow is just as cute as the front. It looks like a tiny bow tie a man would wear.
I had fun challenging myself to try different things with these. My daughter Valerie said I could go crash her stash of wood things, so I'm excited to see what else I can cover.

Thursday, May 10, 2012

Mother's Day, Happy Birthday & Get Well Cards

 
Although my mother is no longer of this world there are still many important women in my life. This year I let them know how much they mean to me.

I picked up a giant art book at Savers with the most beautiful images specifically for the purpose of using them for cards and scrapbooking. As soon as I saw this image I knew it would be for my sister. It reminds me of her and her daughter when she was about this age as well as our love of the ocean. I cut out the image, ran it through my die cutting machine, attached it to a piece of card stock after punching the corners with a frilly corner punch, and added a bow tied from vintage ribbon.
For the inside I cut 2 more pieces from the image (it was quite large), put strips of matching card stock at the center and stamped “Happy Mother’s Day.” I cut out the description of the painting located along the sidebar of the book and enclosed it with the card because sister likes stuff like that.

This is for my best friend. She's a do-it-yourselfer, so I chose this image of a woman doing some plumbing. It's cut from some wrapping paper I've had tucked away for eons.
I used an oval die, ran it through my Vagabond and stamped "Happy Mother's Day" at the center.

 
For my best friend's mother. She's like a second mom to me.


This one is for my awesome mother-in-law. I recently made her a birthday card and she was so thrilled with it she said she was going to frame it. For now on I need to live up to that expectation. No pressure. haha! I cut the ladies from a post card that came with a scrapbook order, used the lady button (one of several packages my daughter gifted me) and threaded it with twine. The polka-dotted paper was cut using my die cutting machine and then layered it with other papers.
I used the polka-dotted pieces left over from cutting the piece on the front to border the inside. I find it difficult to throw pieces like this away, so I'm always trying to use them up to justify the paper hoarder in me.
 
 
This is for my mother's best friend who is now in her mid-90s. My mom is gone now and so are her best friend's children. She's lost most of her family and friends, so I'm happy I can send this to her.
She'll love the buttons.
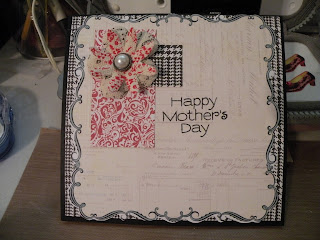
For my sister-in-law. I fussy-cut the edges of the card stock then applied it to the plaid. I used scraps from the 2-sided plaid card stock for added interest, fabric flowers attached with a pearl brad, and stamped the greeting.
She called me when she got it. One of her son's dogs got a hold of it when it was delivered through her front door and chewed a corner. I told her next time I'll hand-deliver it.

 
I made a couple more after I took the group photo. This was made for my sister's mother-in-law who used to sew up a storm. She's in her 80's now so she doesn't sew as much as she used to. The button portion of the card was cut from my daughter's Silhouette.
She's one of the sweetest women I have ever known.

 
This card was a challenge because it's going to someone who has lost both of her children. Mother's Day is bittersweet for her and I just wanted her to know I was thinking of her.

I also made a birthday card for one of my closest friends (I am blessed to have what I consider several life-long best friends!). I used one of my Sizzix alphabets for the first time. I cut her name out of a shimmery blue sticker-backed card stock.
I borrowed my daughter's banner punch, it's adorable! I used baker's twine to pull it together and a couple of tiny brads to attach the parchment paper sentiment. Another punch was used in the corner to cover up an uneven cutting. Another punch borrowed from my daughter, clouds, punched from silver reflective sticky-backed card stock.


The other night my daughter texted me and said one of her friends had surgery and would be off of work for a few days, so she was putting in an "order" for a get-well card. She said she liked purple. I had it finished by the time she got off work. Go me.

Father's Day cards next. My dad has been gone for eons, but there are still special men in my life and I want them to know it. Crafting for men can be challenging, but I'm up for it. I think.

Sunday, March 4, 2012

My First Smash Book


SMASHING!

I began this *Smash Book back in June 2011 and finally finished it the 1st of March 2012, whew! I very much like the end result. It probably isn't much of anything to anyone else but me, but that's what journaling is all about. I just thought it would be fun to show my version of smashing.

Maybe once you see the mish-mash of things I've stuffed inside the pages you'll be inspired to start one of your own. My next one (Orange) is already waiting in the wings! (For photos of the book in its entirety be sure to visit my Flickr.)

The handy-dandy pockets come 3 to a pack with one built-in on the inside-back. It's a great place to put the things you want to stick inside the pages when you don't have time.
I used the tiny photos that came with my photo orders which are printed on 6"x4" photo paper. They're perfect for Smashing, inserting into a locket or to use with any number of other projects.

Look closely at the center of the right-hand page. I stamped a peacock feather and like the way it turned out. You will see it on another page where it's not so subtle.

A lot of people make their own books, which I may tackle some day, but for now I need a starting point. The images on the pages of the Smash Books, as well as other products this company publishes, work as prompts and provide me a great place to start. Even the pen that comes with the book is great, and the glue at the opposite end is the best of this type I've ever tried. Really.

This is one of my favorite pages. I played around with some of my stamps and markers, even tied a real ribbon around the bouquet of flowers. My images aren't showing it, but my favorite pen is a sparkly-glittery type pen and I used it every single chance I could get.

I love buttons!

  
This was the last page I did. It's especially meaningful because every time I looked at that bicycle page I wanted to do something with it, but I got nuttin'. It all finally came together one day when I got home from doing some errands and spotted a piece of paper on our front lawn. It turned out to be what looks like an ice cream label with "Joy Joy" written on it, it's so perfect!

I added vintage ribbon, cut the ends into tiny strips and glued them on to the ends of the handlebars. I also took my glittery pen to the shiny parts of the bicycle so it sparkles where the light hits it. It's another favorite page of mine.

My daughters surprised me with a Vagabond by Sizzix (GAH!), so I played around with some of the dies and shared some here. I also bagged some up to go along with a few Smash Books we are giving as gifts. There are so many dies out there that I tell everyone I know if they ever want to give me a gift (for the rest of my life), dies will make me very  happy.

My top ten were in no particular order, of course, I mean, who can do that? Number 3 is books, so I made a miniature book especially for this spot.

Thistle was our old lady baby, we had her for over 15 years. I couldn't leave her out. And that back yard of ours, it's tough to keep up, but when I'm done mowing it's very satisfying to see what I've accomplished. And it smells goo, too! I used the built-in pocket for glue dots, envelopes, journaling paper and whatever else I thought I might need to make it easier to journal.
To see the entire set of photos with close-ups, please visit My Flickr under the set titled Smashing.

*I am not affiliated in any way with the company who publishes Smash Book products, I just think they're nifty.