Showing posts with label scrapbooking. Show all posts

Saturday, May 3, 2014

Happy National Scrapbooking Day!

(Layout of Buddy-Gibbers by my daughter Dawn)

Wednesday, May 15, 2013

Pen and Quill

I made this card for a friend's graduation. As usual, it was one experiment after another, and, luckily, everything came out just right. The background was embossed and rubbed with gold Delicata ink. I love that stuff! See that feather?
I cut it out of white cardstock using a die and sprayed with some Tinsel Color Shine. Next step was to cut the edges into a gazillion thin strips to give it a more feathery-type look. I like it!
I cut the inkwell and diploma from pieces of scrap vellum saved from an old American Girl magazine cover. The inkwell was sprayed with black Color Shine and sealed with Glossy Accents. When I applied the Glossy Accents the ink smeared and made a pretty nifty finish, kind of like a real smudgy old bottle of ink. I burnished the lines on the back of it so the outline would pop out and applied a brown pop dot at the center. I scrunched up the diploma, tore the edges and inked it up with the same gold ink as the background.
Dawn cut the sentiment and graduate figure with her Silhouette for me. It gave the perfect finishing touch to this special card.
My daughters liked the feather so much I made them one for their craft stash. I'm going to make more in different colors because I'm obsessive like that, yo.

Friday, March 22, 2013

Card Crafting

I've been busy making cards for a few people, yay! This first card was made for someone to whom I wanted to send a bit of encouragement.

I wanted to send something uplifting, so I chose this adorable bunny stamp. I'm so in love with her! I stamped her then colored her with Faber-Castell pens, my first piece using them. Valerie surprised me with them and I wasn't sure if I would do them justice, but I think I did okay. I ran a die-cut piece through my Vagabond inside a dotted swiss embossing folder to give her a sweet backdrop. I finished off the inside by die-cutting the sentiment, "Find what brings you joy and go there." I love that word...joy.

The next card was made for my brother's mother-in-law, Patricia, born on Saint Patrick's Day 85 years ago! She really is a blessing. I tried a technique I saw on YouTube by Sari Hanninen using dies as templates as well as leaving the die attached to the paper after it's cut. After securing it with Washi tape it's ready to be inked up. When the die is removed a nifty border is revealed, which gives it more depth. I used it on the two yellow pieces and really like how it turned out. What do you think?

I made the next card for my daughter's co-worker who was promoted. I bought the lettering with Robin in mind because it looked office-y (and it was on sale!). I came across the bird print paper in my stash and thought, hmm, I wonder... The lettering and bird are so different, but I think it ended up working in its own unique way.
The sentiment is one long piece of Washi tape. I like the simplicity of it.

Finally, here's a birthday card I made for someone I follow on tumblr. I knew I wanted to use one of my La-La Land Marci stamps, but I wanted her to wear glasses. I was tickled to find a pack of chip board eye glasses at Michael's that are similar to the ones she wears, score! I sprayed them with Heidi Swapp's Color Shine in black velvet to make them sparkle then attached tiny rhinestones at each corner. I popped them up with black pop dots so they wouldn't interfere with the little embellishments I added to her pony tails.
The inside sentiment is a piece of Washi tape (I love that stuff). I stamped a tiny dog in the corner that's similar to her dog.
I picked up supplies to make Easter cards. Maybe I'll have something to post for you to read about sooner rather than later (Janis).

Thursday, February 14, 2013

Love

I love crafting for my family, and I decided to go big and frilly and gaudy this year on their valentine cards. Since I didn’t have to mail them I added lots of embellishments like the big felt hearts, the paper flowers tied with baker’s twine and the pillow-y paper doilies I colored and sprayed with a shimmery spray. I even dived into my supply of Washi tape, holla!
 I made a little pouch inside for a place to tuck the bookmarks I crafted, made from leather samples I picked up at a thrift shop.
 
I embossed each one with silver embossing powder, a successful experiment! (Yay cause I have a bag of those samples!) They came with a ready-made hole on one side, so I slipped in some ribbon.
Hubby got the glasses, Dawn the typewriter and Valerie the elephant. The elephant is my favorite; the leather gives the embossing the perfect hide affect.
I love discovering new techniques like this and can’t wait to make more.

Chocolate and Craft Fodder...Heaven!
Deni gave me the coolest box of chocolates, ever, and a beautiful card. My daughters gave me Memento Ink and a ink resist pad. The combination of chocolate and crafting supplies is the way to my heart. Thank you, Deni, Dawn and Valerie! I love you more!

Saturday, February 2, 2013

Shrinky Dinks & More

I miniaturized one of my La-La Land Crafts Marci stamps! Not puffing my chest, but I think she's adorable! It was time-consuming, but so are the regular-sized ones. The important thing is I had fun making them.

Alcohol-based permanent markers are key to success with non-porous surfaces. I don't own any of the cost-prohibitive Copic Markers (that's a lie, I have one, a blender), I pulled out my Sharpies and a little brown Staz-On ink w/paint brush for her hair. They worked great, I just need to borrow a few more colors from my daughter next time.
I placed rhinestones on her shoes and pony tails, and tied a little bow at her waist with two strands of pink thread. I added a coat of Glossy Accents to her hair to give her some depth. I'm thinking of making a pin out of her and maybe putting a hole at the top the head for necklace if I make another one.

My sister commissioned me to make a thank you card for a friend with brown hair. This is what I came up with.
I made the little bench from a piece of balsa wood, no die, from scratch! I tickled with how it turned out.
I even made a matching envelope! My sister loved it. She texted me today and said she had it out by her computer so she could admire it before giving it away. I love her so much.


Tuesday, January 22, 2013

Made A Few More Cards

I so enjoyed making these little girls from the Marci rubber stamp line from La-La Land Crafts. I finally got around to putting them on cards. It's nice to have them all ready to go for any occasion that might arise, last-minute or otherwise.
The one above is my favorite. I used the fence die Valerie gave me. I'd like to do more with this die, it's so whimsical.
For a few of these I started with store-bought cards Dawn gave me and embellished them. The strawberry girl below sports a tiny strawberry I fussy-cut and then popped it up after coating it with Glossy Accents.
This last one was made with layers of different colored card stock on top of a blank note card decorated with hearts. A strip of LOVE Washi tape (that stuff is addicting!) is along the bottom and heart Washi tape was added next to the little girl. I drew white stitch lines between each layer of card stock for a little something extra.
My daughters surprised me with a bunch of new little girl stamps and other crafty things like glass-fusing products for the microwave kiln I got for Christmas (I haven't tried yet) and some of the most awesome 12"x12" card stock I've ever laid my eyes on.
I can't wait to play with it all!


Saturday, January 12, 2013

Card Holder For San Jose Sharks Fan

I'm flattered hubby asked me to make him a card holder for all of the cards he received while visiting his parents during the holidays.
We're huge San Jose Sharks fans, so I dug into my stash and found ONE 12"x12" piece of hockey scrapbooking paper. I embellished it with a couple of photos taken by my daughter which I ran through my die-cutter using a die in the shape of a postage stamp. I made a couple of pockets for the inside to hold cards and notes that won't fit between the binder rings. Man, that paper went a long way!
I'm not sure if the beads are "manly" enough for my man, so they may eventually show up on my craft table.

Wednesday, January 9, 2013

Washi Tape At Costco

I picked up this set of Washi tape by We R Memory Keepers, complete with holder at Costco, of all places. They rarely have scrapbooking/card-making stuff, so it was an unexpected fun find.
 
I like that it fits inside my Washi tape container.
And by unscrewing the center handle, the lid even closes, holla!


Thursday, January 3, 2013

Lots Of Crafting Goin' On

I was able to get a lot of crafting in this past month or so, yay! I'm going to pack a lot into this post so you can see what I've been up to. Sit back, grab a cup of tea or coffee, and enjoy.

HAPPY NEW YEAR!
I wanted to send out a few New Year's cards, but searching the crafts stores both on-line and off brought me nothing. Leave it to Dawn to find this adorably perfect stamp! There was a lot of fussy cutting, paper piecing, coloring and Stickles involved, about 3 days' worth of fun. Each one was different because I had specific people in mind. I wanted to get the hair and even the pets just so. I failed miserably at the pets, though, I should have shopped better for those, but maybe I caught the essence anyway.

I stamped the girls using black Staz-On, but upon reflection I wish I had embossed them for a more polished finish. I placed pop dots under the little girls so they stand out from the background and gave each one a tiny companion. The inside sentiment was embossed with detail black embossing powder and also popped up. Each banner is backed with a matching piece of card stock from the front. The stars were cut from sparkly paper using a die with my Vagabond. I inked the edges to give them depth.
My daughters puffed my chest by telling me they were little works of art and I couldn’t give them away, I should frame them, and would I make them a couple to keep. They’re so good for my ego. (More photos and details on my flickr.)
A YEAR'S WORTH OF LOVE IN CARDS!
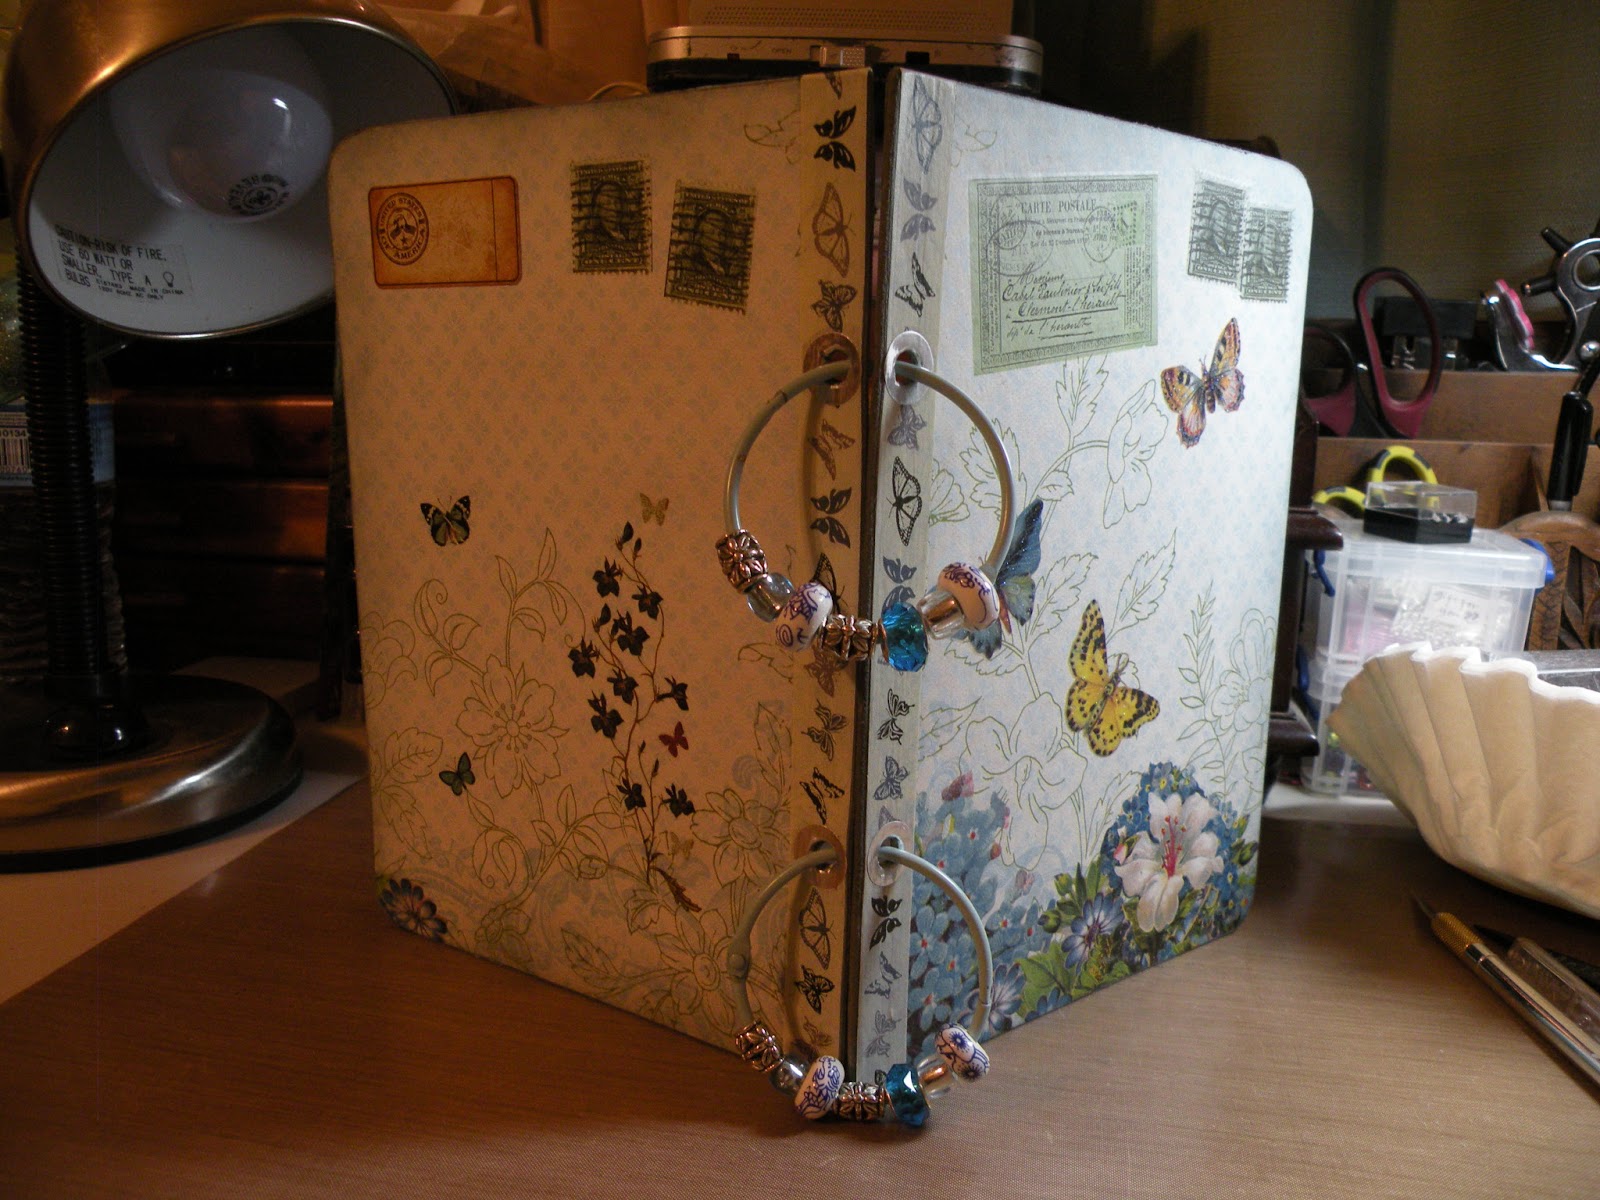
Since my card-holder was filled to the brim...
 I made myself another one.
I’m normally not one for the frou-frou, but a friend of ours gave me 3, 12”x12” stacks of some pretty gorgeous paper for Christmas and I just had to use some of it. I’ve always liked butterflies, so I chose two pieces that compliment one another. Also, the sparkly ones drew me in.
I embellished the pages with rub-ons, stickers and Washi tape and inked the edges with a subtle blue. I added pockets to the inside adding the word “memories” on one and cutting a square of the same pretty cardstock for the other. My daughters have given me lots of beads lately and they’re perfect for this project. I'm excited because my husband liked it enough to ask me to make one for him! (More photos and details on my flickr.)

HAPPY ANNIVERSARY, MARTHA AND LARRY!
  
I made my sister and her hubby an anniversary card using some adorable prints Dawn gave me. Again, my ninja paper-cutting skills came in handy, especially on the tiny duckling. They loved it
FIRST CROCHET IN LIKE FOREVER
Around Midnight on Christmas Eve I came across this free PDF pattern for a dish cloth and tracked it to a site called Tangled Yarn. I hadn't crocheted in a couple of years, probably, or at least haven't made anything. I thought, I could do that, and so I did. It called for a triple crochet, and because I hadn't done it in such a long time I had to look it up on YouTube. It's a bit wonky, but my sister Martha liked it. As a matter of fact it reminded her she wants to re-learn crocheting this year, so the other day we sat down and I showed her how to make a chain. One step at a time.
THINK PINK!
My sister-in-law is a 4-time cancer survivor. The second type was breast cancer, which resulted in the removal of her left breast. She collects all things pink ribboned and is decorating a small tree with this theme in mind.
We went to Michael’s and she picked out a packet full of lovely breast cancer awareness crafting fodder because she wanted me to make some rosettes for it.
I gave her back the kit when I dropped them off so she could finish them off at the center the way she liked. Besides, that’s the fun part. Here are a few of the photos she texted me. Beautiful!
HAPPY BIRTHDAY, DENI!
I made my hubby a birthday card with a gift/present theme. I cut out his name with a die using my Vagabond. You can't see it in the photo, but I sparkled up the lettering with a glitter-type pen. I cut out some presents, popped them up and added the letters to each one.
I also cut the sentiment from a birthday die and added it to the inside. The little gift in the corner is also popped up with a pop dot.
There were a few other things I made, but I'm making this too long as it is.

I love crafting and have fallen in love with card-making. I hope to hone my skills and pick up some speed. I spend a lot of time on each card, maybe too much. But when I'm making a card I'm thinking of the one who will be receiving it, so I want to make it as perfect as possible. Not because I want accolades; I want the recipient to know they are special and worth the time and extra effort I put into the card they are holding in their hand so they can feel the love that goes along with it.

Note: If you would like to see more photographs and explanations of the crafts I make, please see my flickr.